Control Your Salesforce Metrics Any Way You Want with Salesforce Campaign History Metrics
John
manages customer onboarding at Cazoomi. Enjoys working out, family time, and traveling the Philippines.
7 minute read
Control Your Salesforce Metrics Any Way You Want with Salesforce Campaign History Metrics
You like metrics, don’t you? I know I absolutely love them!
But (BUT!) only when they are neatly arranged in a way that you can easily make sense of them. And by making sense of them, I mean deriving actionable insights.
Those insights vamoose if your metrics are siloed across automation and marketing platforms. How will your sales team know which email subscriber is now a warm lead if they can’t see the subscriber clicked three times on the same link?
Are you going to nudge them and let them in on the scoop every time that happens? That’s so 2001!
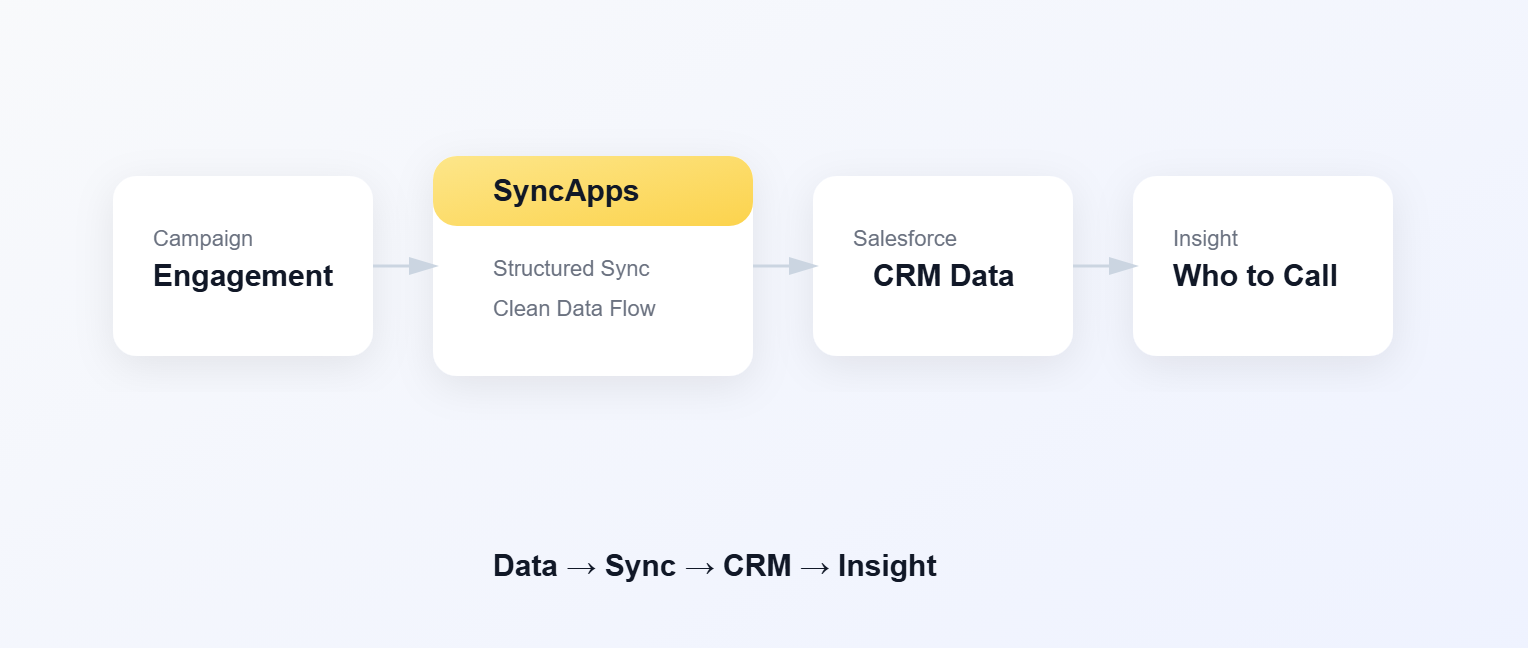
Today, there’s a much better way! You can control your metrics any way you want, and SyncApps is the platform to do that.
Through SyncApps, you can do even more than neatly order your metrics. You can have them automatically flow into Salesforce from other platforms, choose the metrics you want to follow and those you want to ignore, set alerts, and more.
Let’s see how you can do that. No, let’s see how SyncApps can do that FOR YOU.
Capture Customer and Lead Intent with SyncApps
After all, this is what we all care about as marketers, right? Figuring out what a lead or a customer may intend to do is vital in delivering the right message at the right time.
Let’s say your marketing team hits publish on a new blog post that contains a limited-time offer. They also send an email promoting this blog post and the offer. The moment you see a spike in email open rates, click-through rates, or clicked URLs, you know that your email has landed where it should.
It is now time to show this to your colleagues in sales. You have to let them know that your offer attracted more eyeballs than the usual sales and marketing process.
We’ve already established that this is not 2001, so you don’t have to let them know per se. You just have to let SyncApps do it for you.
Here are your options:
Create a Salesforce Campaign from Your Marketing Automation Solution (Ideal if You Want Near-Identical Views across Platforms)
SyncApps will create a 1:1 replica of your campaign in your marketing automation platform in your Salesforce dashboard when you use this option. Everything’s included: metrics, members, and more.
This is how you can do it:
Create your automation.
In Step 1, select “Constant Contact Marketing Metrics to Salesforce,” then “Campaign Response Sync Mode,” and finally, “Create Salesforce Campaign.”
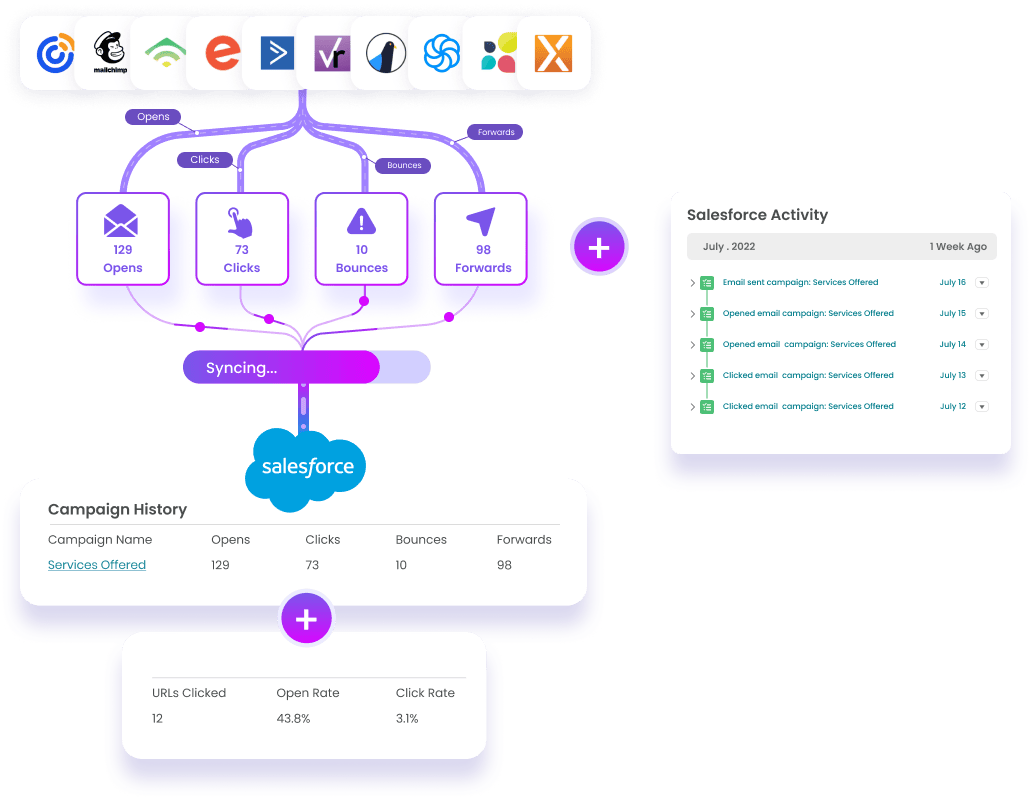
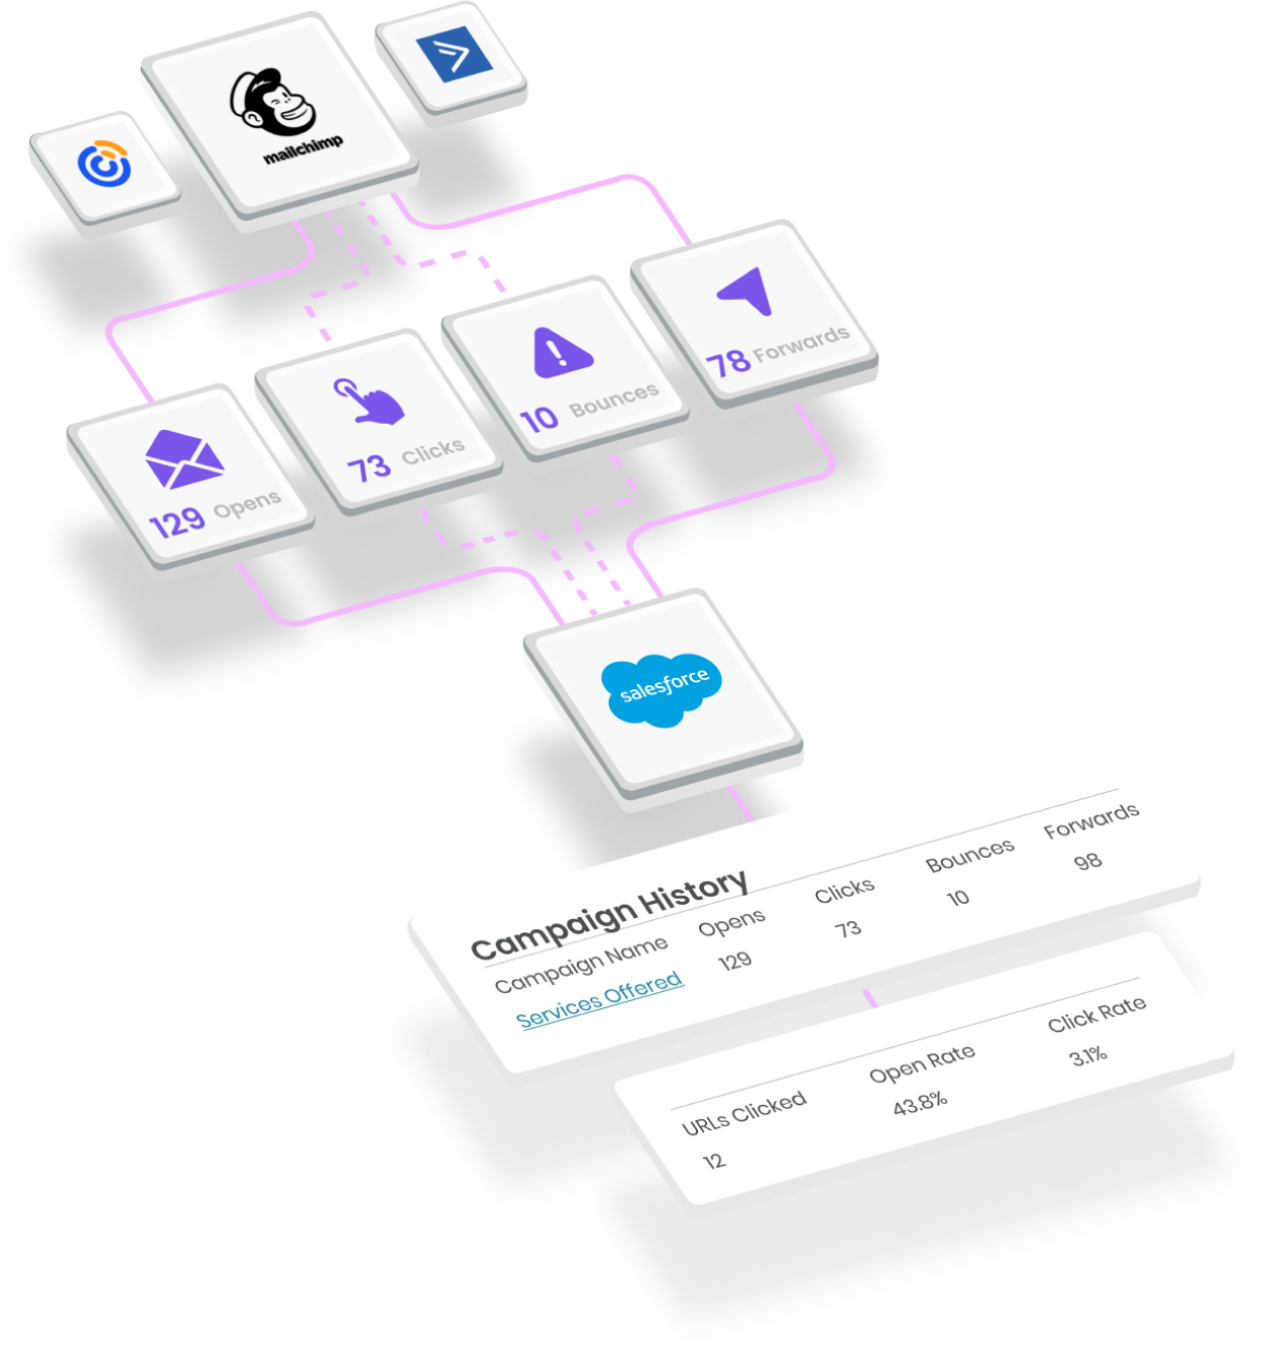
Click next, and SyncApps will auto-create the Campaign Response fields in Salesforce (opens, clicks, bounces, URLs Clicked and Open Rate, Click Rate).
Other metrics you can bring back to Salesforce with a single click are:
Clicked: the recipient clicked on a link
Opened: the recipient opened the email
Bounced: the email bounced
Unsubscribed: the recipient opted out of an email campaign
Sent: The recipient is a member of the Email Marketing Campaign, and none of the above statuses applied.
Plus, you can optimize this any way you need. Some of our most popular options are:
Campaign in Salesforce
Activity in Salesforce
Both Campaign & Activity
Note + HTML Template
Create only a Salesforce Campaign (No Campaign Members)
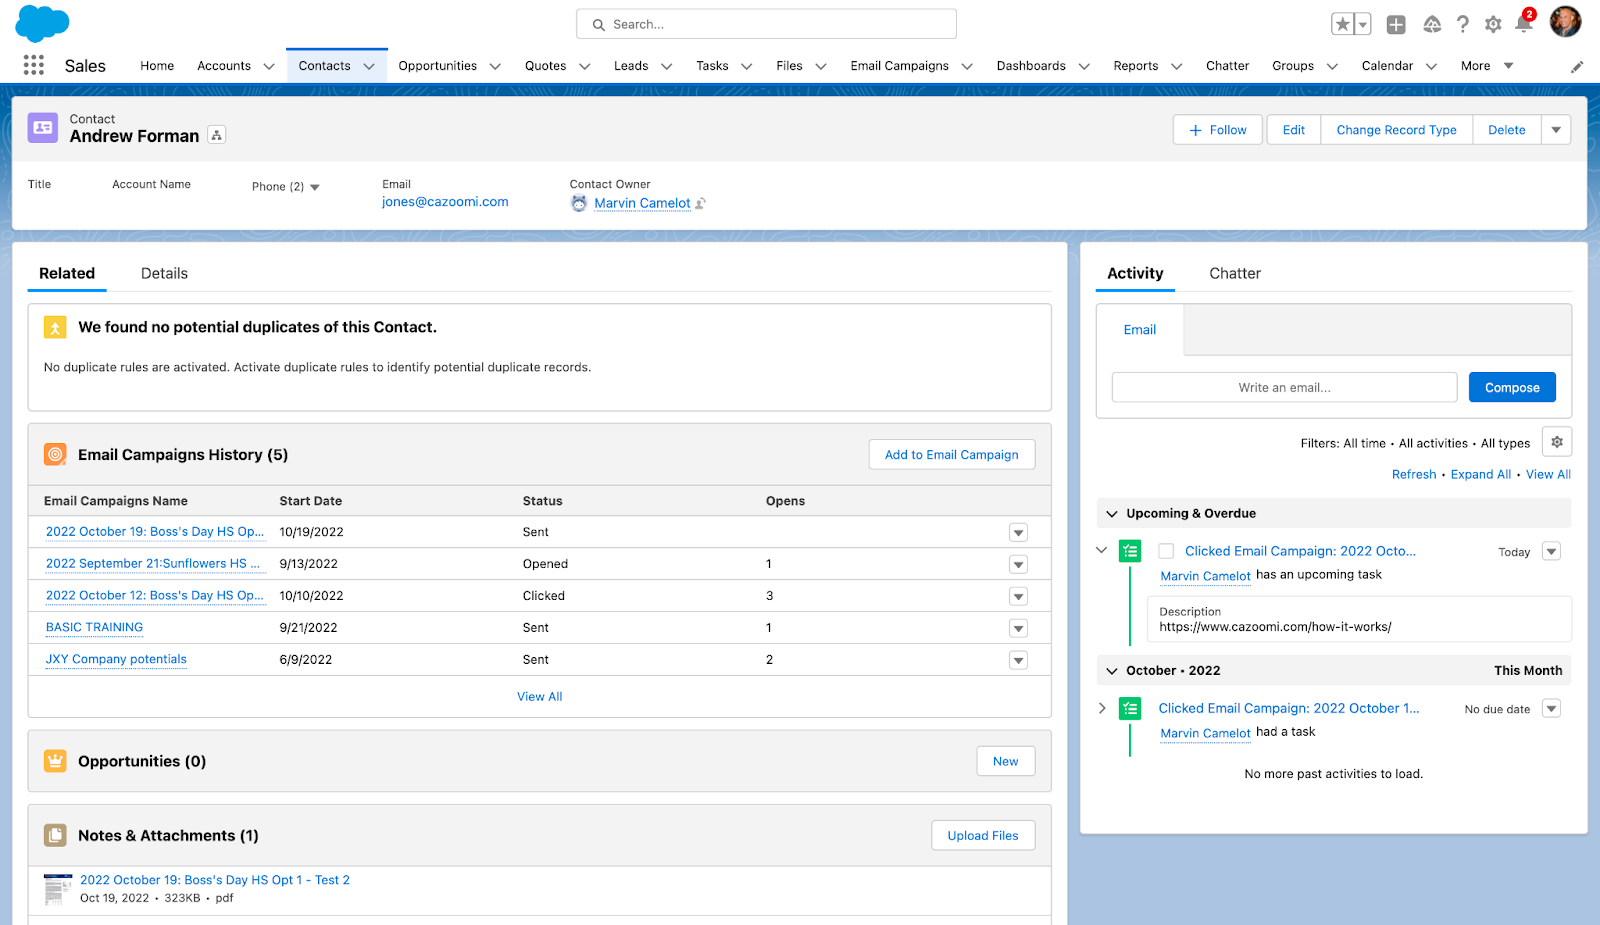
The campaign engagement will be visible under the Campaign History tab:
To help your Salesforce colleagues even more, you can choose only to sync back those Campaign Members who interacted with the email sent. This way, you’ll keep things nice and clear and optimize your Salesforce storage.
Need more options for controlling your metrics? We’ve got them!
Create a Salesforce Activity from Your Marketing Automation Platform to Signal Campaign Highlights to Your Colleagues and More
You can use this option to create a new Activity (Task) in Salesforce for each event (like an Open or a Click). You also have the option to track clicked URLs and Send Events as Tasks.
By default, URLs Clicked are synced to the activity description field.
This option is very similar to set up to the one above:
Create your automation.
In Step 1, select “Constant Contact Marketing Metrics to Salesforce,” then “Campaign Response Sync Mode,” and finally, “Create Salesforce Activity.”
Click next, and SyncApps will auto-create the Campaign Response fields in Salesforce (opens, clicks, bounces, and more).
Please note that, by default, URLs Clicked are synced to the activity description field.
Need to sync to a specific field? Like, for instance, “Clicked URLs”? All you have to do is create a new Activity/Task custom field in Salesforce and map it in Step 4 of your setup.
Please note that the Activity Task subject naming convention is set by SyncApps using the following logic:
If an Activity status is not mapped, then the status (opened, clicked, bounced, sent) will be added to the task subject. Example: Clicked email campaign: Test campaign 1
If an Activity status is mapped to a custom field, then the status is not added to the task subject. Example: Email campaign: Test campaign 1
Create a Salesforce Campaign and an Activity (so that You Have Everything from Your Marketing Automation Solution in two Places in Salesforce)
As you may have guessed, this option is a combination of the two options above. The setup process is equally simple:
Create your automation.
In Step 1, select “Constant Contact Marketing metrics to Salesforce,” then “Campaign Response Sync Mode,” and finally, “Create Salesforce Campaign + Activity.”
Click next, and SyncApps will auto-create the Campaign Response fields in Salesforce (opens, clicks, bounces, and more).
If you choose this mode, the Email Event field will be populated in both Activities and Campaign.
Create Contact or Lead Notes to Enhance Compliance
This option is ideal for financial institutions, insurance agencies, banks, and other similar organizations that need this model for compliance reasons.
You don’t need an extra field placement when you use this option. SyncApps will sync back your email campaign(s) to Salesforce Notes and add the email sent as an attachment to Leads and Contacts.
Please note that the Email Attachment option takes up Salesforce Storage. Make sure you have enough storage available to use it.
Bring Only Marketing Metrics Back to Salesforce to Get the List of it and Save on Salesforce Storage
Looking to save up on Salesforce Storage and still enjoy state-of-the-art reporting? We’ve got your back!
This option will create a Campaign in Salesforce from your marketing automation solution, but it will only populate it with the total number of Campaign Metrics from a specific Campaign. Since no Campaign Members are synced, you will save a ton of your Salesforce Storage.
As I’m sure you were expecting, this option is also straightforward to set up:
Create your automation.
In Step 1, select “Constant Contact Marketing metrics to Salesforce,” then “Campaign Response Sync Mode,” and finally, “Bring Only Marketing Metrics Back to Salesforce.”
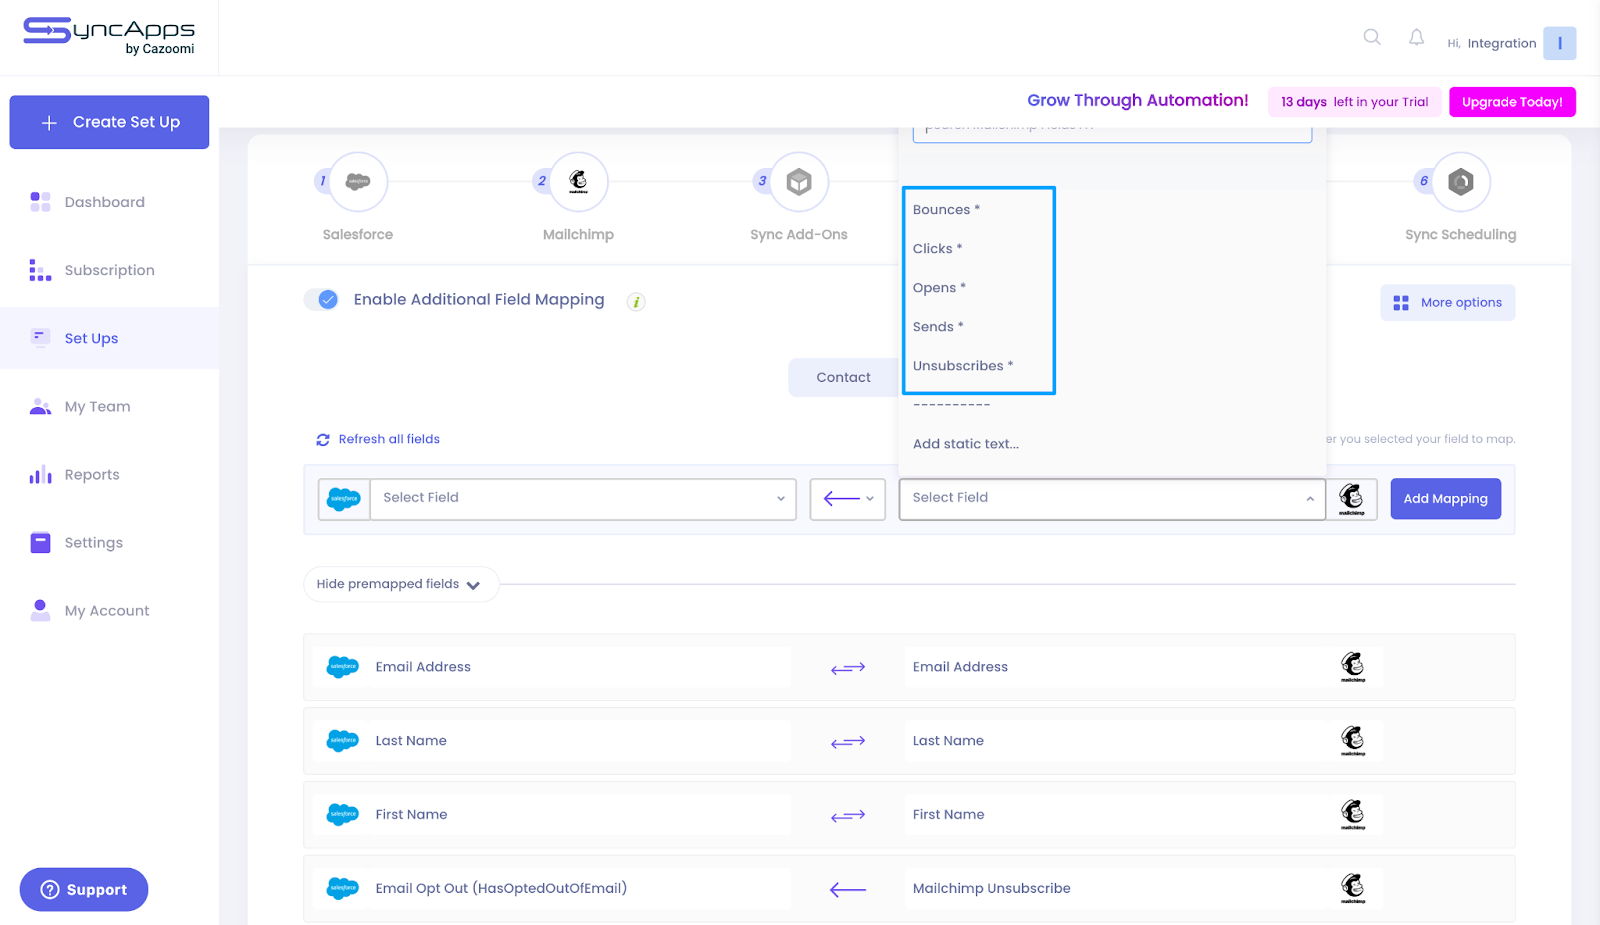
Choose the Campaigns Tab in Step 4 to map each field.
You can map as many or as few fields as you need.
Fields like Opens, Clicks, Forwards, Bounces, Unsubscribes, URLs Clicked, and Email Events are mapped in Step 4 for summary-based reporting in Salesforce.
This is all from us on this topic. Armed with this info, you’ll be able to easily segment your users and target them with relevant messages and relevant campaigns.