The number of cyber-attacks has increased exponentially (by 800%!) during 2020, especially after most of the world started working remotely. This spike is bound to continue for a while, even in the post-pandemic world.
There is another trend that has to be correlated with this one, a trend that affects NetSuite users, as well as the users of similar services: the need to eliminate the requirement for password management and rotation for integrations. This is extremely important, especially for NetSuite consultants and agencies that manage accounts on behalf of their clients.
Luckily, for web-based integrations, NetSuite supports TBA (Token-Based Authentication). This type of authentication allows the client applications to use a token in order to access NetSuite through various APIs. This way, there is no need to store user credentials. Thus, your web-facing assets are safer and you have one less thing to worry about when it comes to cybersecurity challenges.
At SyncApps by Cazoomi, we cater to 1000s of NetSuite subscribers who need their integrations to work seamlessly and be 100% secure. A tall order?
Perhaps. But our plans are designed just for that: to ensure that all our subscribers can make the most out of the integrations we offer. So, whenever they need us we are always there to offer solutions to their problems or to build new features from scratch, just so they can create their campaigns and flows exactly as they need them to be.
Let’s take a look at some of the most common NetSuite permissions issues and their solutions — don’t forget to bookmark this article; you might need it sooner than you think!
Permissions Most Users Get Wrong During Setup
Are you getting this error after syncing your data?
Error code: INSUFFICIENT_PERMISSION and USER_ERROR
It’s a common problem and one that the NetSuite API does not give you much information back as to what the issue actually is so you can end up spending countless hours figuring it out or just by asking our experts!
Be sure when you book our experts that your NetSuite administrator or consultancy is on the call so we can review in detail any setup or permissions that are needed.
You can read about it in detail here: Required Level of Permissions for NetSuite Integration.
Want a quick overview? Scroll down to see common NetSuite permission issues according to each type of supported integration. All the items are illustrated with real-life examples from our own subscribers.
NetSuite Integrations Supported:
Meet Hawk Ridge Systems, our subscriber in the Software Industry. Hawk Ridge Systems offers design, manufacturing, and 3D printing across the US and Canada. They rely heavily on NetSuite for their accounting and for tracking customer success. Zendesk integration helps them manage sales funnels better and improve customer success.
They received the error above and we helped them fix it. Find how below:
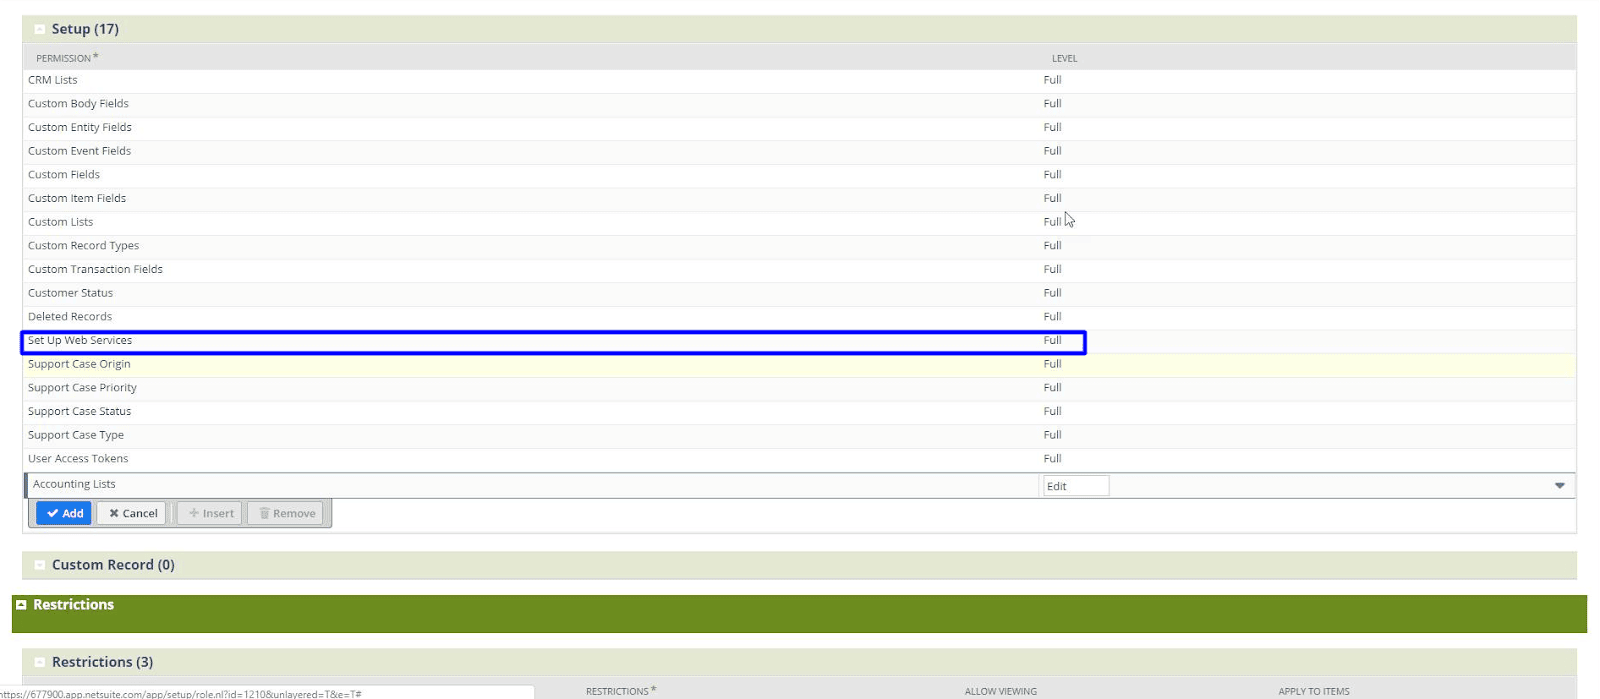
They are two different permissions instead of “Setup -> Set Up Web Services” instead of “Setup -> Web Services”
Now you need to have the specific PERMISSIONS LIST for the role. Please check each.
Please assign the following permissions (Full) to the NetSuite Custom Role.
Do note that after adding new permissions in NetSuite, they can take up to 24 hours to take effect.
REQUIRED
1) Lists – Customers (if you have renamed this Entity in NetSuite, please select
the Entity name instead)
2) Lists – Contacts (Contact Roles)
3) Lists – Marketing Campaigns
4) Setup – Customer Status
5) Setup – Custom Fields
6) Setup – Custom Body Fields
7) Setup – Custom Entity Fields
8) Setup – Custom Record Types
For accessing any custom field with custom record reference, please make sure
you also assign Lists > Custom Record Entries permission.
9) Setup – Custom Lists
10) Setup – CRM Lists
11) Setup – Deleted Records (for Deleted Customer/Contact sync)
12) Setup – Setup Campaigns (for Subscription sync)
13) Setup – SOAP Web Services
14) Setup – User Access Token (for Token-Based Authentication)
15) Find Transaction – Transactions (if you use this type of Saved Search)
16) Transactions – Sales Order, Return Authorization, Quotes, Estimates, Invoices, etc. (if using these types of Saved Searches)
Note — you must also add additional permissions to access
any objects that are used in your Saved Search criteria for Transaction Saved
Searches.
17) Lists – Partners (if using this type of Saved Search)
18) Lists – Vendors (if using this type of Saved Search)
19) Lists – Employees (if using this type of Saved Search)
20) Lists -> Employee Record if accessing the Sales Rep field in NetSuite.
Please continue scrolling down as you might have other integrations with SyncApps that require to permit more lists.
With Zendesk for NetSuite integrations, you will also need to assign the following NetSuite Permissions to Full:
1) Lists – Case
2) Lists – Employees
3) Lists – Employee Record
4) Setup – Support Case Status
5) Setup – Support Case Type
6) Setup – Support Case Origin
7) Setup – Support Case Priority
8) Lists – Events
9) Setup – Custom Event Fields
10) Lists – Track Messages (for Comment sync)
Another interesting use case came from our subscriber XYZReality in the Manufacturing and Construction Industry. If you don’t know them, check out their website. Their work is truly fascinating: bringing AI and BIM to the construction industry. We’re super proud to support such innovative companies!
XYZReality also uses our NetSuite for Zendesk integration but they got an error when setting up.
Subscriber’s message: I recently carried out the set up for our Zendesk/Netsuite integration. I noticed that some of the permission fields in the instructions were not present in our NetSuite profile and I couldn’t select them. Please note that one of the errors says that the Lists -> Customers’ permission should be selected, and it already is.
SyncApps solution: To make that happen, just make sure to add the Custom Text field for Serial Number in Zendesk Ticket and also add a Custom Text field in NetSuite.
Once done, head to Step 4 of the integration and map these fields.
When you run the sync, the Serial Number in Zendesk will then be synced to that Zendesk Case field.
To have exposed the “Create RMA” Button you will need to install the Zendesk App, see our quick instructions below:
In Step 1 of your Set Up to install the Zendesk App for NetSuite.
SyncNotes:
The RMA feature for our Zendesk for NetSuite can be utilized after your automation is created because the RMA feature needs to connect to NetSuite using credentials defined in your integration from within Zendesk.
Please open up the Zendesk for NetSuite while on a Zendesk ticket to display the RMA tab and the RMA tab is only displayed if you press the customer details after a search (or by pressing the customer details link), then press the “Create RMA” button.
RMA (Return Merchandise Authorization) feature for Zendesk
For the Zendesk App for NetSuite, you will also need to assign the following NetSuite Permissions to Full:
1) Transactions – Sales Order
2) Transactions – Cash Sale (for some Customized apps)
3) Transactions – Item Fulfillment
4) Transactions – Fulfill Sales Orders
5) Transactions – Return Authorization (for RMA creation feature): Full
Lastly, meet the House of Antique Hardware in the eCommerce Industry. They are a well-established antique business. They started reproducing antique hardware in 1999 and, after more than 20 years, they have built an amazing base of steady clients that keeps growing.
To keep their customers up-to-date with their current inventory, they use the Mailchimp for NetSuite integration.
This is the issue they experienced:

SyncApps solution:
When NetSuite returns Code=INSUFFICIENT_PERMISSION this is always related to the permissions needed to run integrations in NetSuite so it is best to keep a chart like below to make sure when you add a new role or employee to your NetSuite to do a quick permissions check.
Under your Permissions in NetSuite from the custom record type “MailChimp Emails – Cust” must be set to “Full”.
For the Mailchimp eCommerce Feature, which brings over NetSuite Orders, Inventory and Customers to Mailchimp’s eCommerce 360, the following NetSuite Permissions are also needed:
1) Transactions – Sales Order
2) Lists – Items
3) Setup – Custom Item Fields
4) Setup – Custom Transaction Fields
5) Transactions – Find Transactions
6) Setup Accounting Lists
7) Custom Record – Customer type
8) Lists – Currency
9) Lists – Locations
10) Lists – Documents and Files
If you’re setting up a new NetSuite account then please see below:
For the credentials part, you can use Username & Password [ (2FA) two factor authentication] or Token Based Authentication (TBA):
And you’ll need to set up your Permissions/Roles in NetSuite. Freshdesk for NetSuite integration, you will also need to assign the following NetSuite Permissions to Full:
1) Lists – Case
2) Lists – Employees
3) Lists – Employee Record
4) Setup – Support Case Status
5) Setup – Support Case Type
6) Setup – Support Case Origin
7) Setup – Support Case Priority
8) Lists – Events
9) Setup – Custom Event Fields
10) Lists – Track Messages (for Comment sync)
For the Freshdesk App (RMA) with NetSuite, you will also need to assign the following NetSuite Permissions to Full:
1) Transactions – Sales Order
2) Transactions – Cash Sale (for some Customized apps)
3) Transactions – Item Fulfillment
4) Transactions – Fulfill Sales Orders
5) Transactions – Return Authorization (for RMA creation feature): Full
In Step 4 of the automation, make sure that you also have mapped the Subject and Details as these are required fields:
Additional Info:
If your colleague is no longer working in your office, sometimes you might encounter this error:
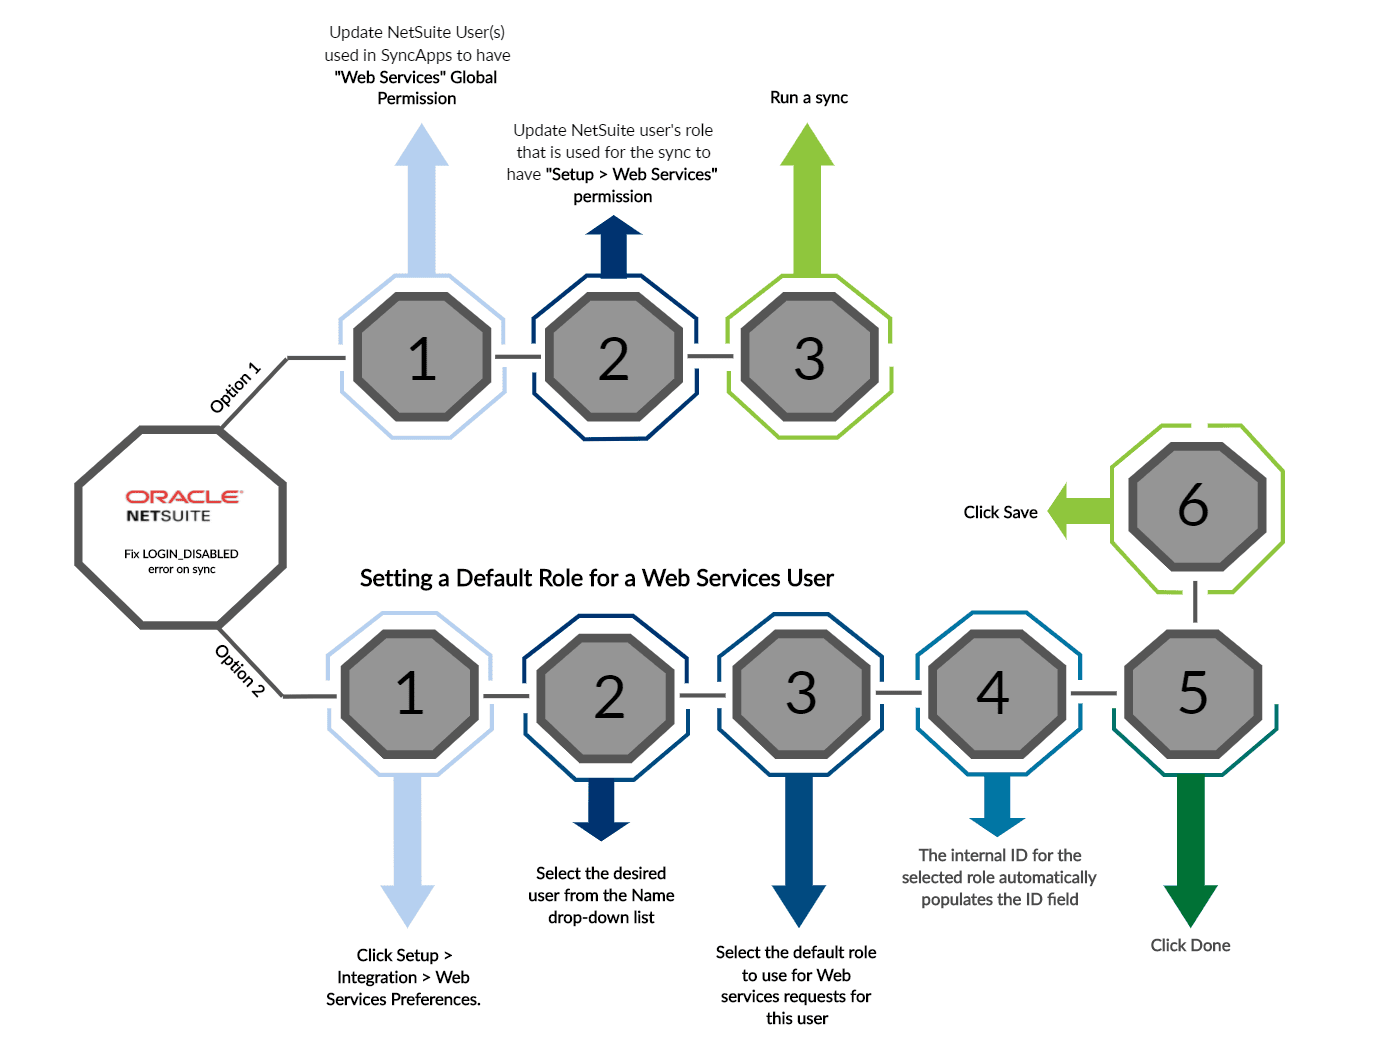
Error on sync: Your role does not give you permission to view this page. (Error code: INVALID_ROLE)
You will need to change the Username or Credentials used in the NetSuite integration used in SyncApps. They will need the roles and permissions to be set up as well.

NetSuite Roles like the Custom Admin are deprecated in NetSuite now yet for your Roles be sure to review with your NetSuite administrator if you run into issues as once these are correctly set up it will run without permission-based errors.
Note: NetSuite kicked in the permissions in their 24-hour window after adding this one.
What about you? Have you ever experienced any of these NetSuite permissions errors? If you’re a SyncApps subscriber, there’s no need to try and fix it on your own. Our 24/7 support department is always there for you! If you’re not a SyncApps by Cazoomi subscriber, what are you waiting for?